Björn johansson

Hands down the best course I've taken at LiU. Mark E. Dieckmann's course in Advanced Global Illumination has you implementing a Monte Carlo Raytracer, with the added option to implement a Bidirectional Path tracer for...
Frequenting graphics programming communities, a technique promising deterministic, constant-time, scene-independent GI was intriguing to say the least. I wanted to practice problem solving, so I took the opportunity to challenge myself by understanding the concept without...
After getting comfortable with compute shaders and multi-stage GPU pipelines, I decided to take on a more advanced project. I implemented a 4-layer JONSWAP ocean simulation...
After exploring Unity shaders with Catlikecoding's shader tutorials, I wanted a project where I couldn't just copy someone else. Diving into compute shaders, image processing, and edge detection, I decided to render Unity onto an oscilloscope by sending video signal through the audio jack...
Fullscreen studios
Shifting sands
Shifting Sands is a hardcore boss-rush arena game featuring tight controls, fast-paced action and a rewarding challenge in gameplay. It started as a second-year vertical slice in 2022 and has since been fully reworked. I was part of the team for a few months during the start of 2023.Apart from taking part in the design, my main areas of responsibility in the game were:Shield-generating statues
Menus/Shop
Shaders for the fading hub wallsThis project is the reason I developed an interest in graphics programming!
For the entire time I was working on the game, I wanted to improve the sand in the arena. I imagined sand running down open pits, particle effects, the surface becoming increasingly disturbed over the course of the fight, and proper reactive terrain displacements, a real hero asset. I couldn't figure out a way to do it at the time, but it lit a spark in me. In almost all my projects since, I'm kind of building towards that imagined sand simulation step by step.
2nd year vertical slice
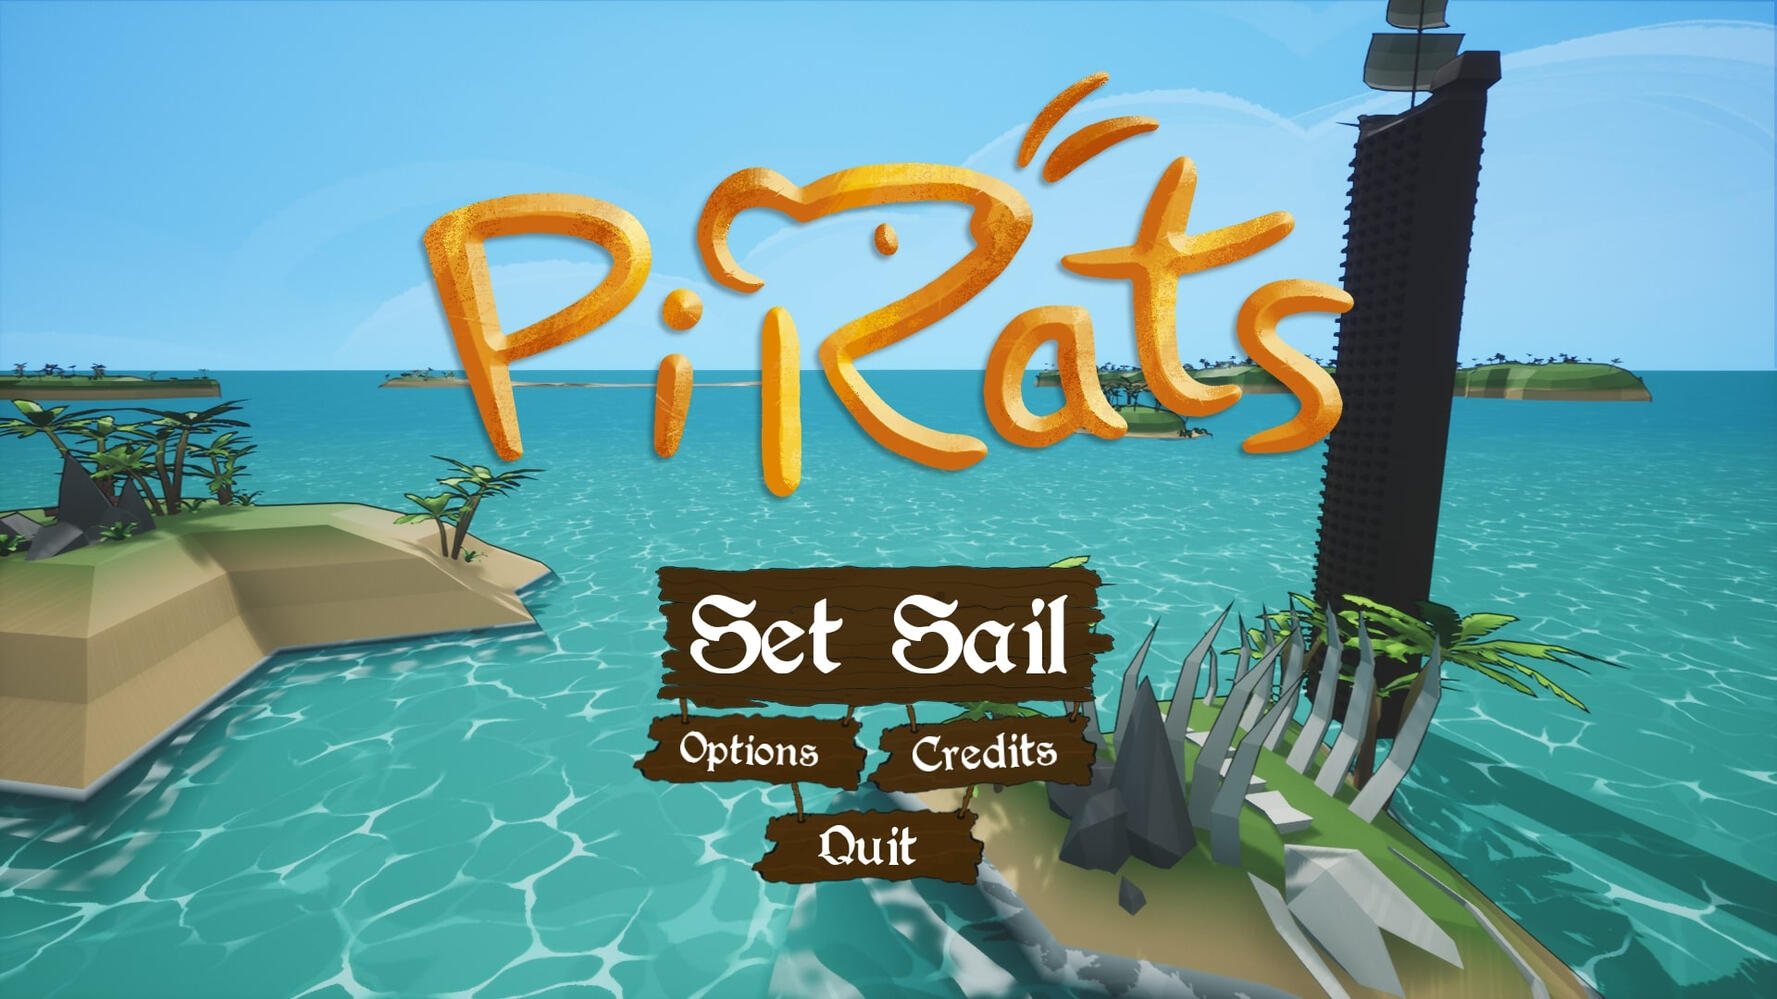
Pi-rats
PiRats is an Unreal 3D arena shooter where you control a pirate ship crewed by rats. It features an infinitely stacking upgrade system that lets you actively break your game as you combat enemy ships and steal their loot while preparing to fight Captain Kraken.Apart from taking part in the design, my main responsibilities were:The upgrade system
Lighting
1st year game project
Into the dungeons
Into the Dungeons is a Unity 2D puzzle game where you play as a manifester of fate. It features a team of 3 AI adventurers travelling through dungeon levels on a grid, with each character having different trap-solving abilities and preferences in treasure. Your job is to fulfil prophecies of who should die, who should live, and how it all should occur.Apart from taking part in the design, my main responsibilities were:AI
Lure / Trap Mechanics
Thank you
I will get back to you as soon as possible.
Bidirectional Path Tracing
Hands down the best course I've taken at LiU. Mark E. Dieckmann's course in Advanced Global Illumination has you implementing a Monte Carlo Raytracer, with the added option to implement a Bidirectional Path tracer for a higher grade. While typically CPU-based, there's no limitation on the language or implementation method.Ever since getting a taste of GI programming during my Radiance Cascades project, I've really wanted to make an accurate path tracer that I can use as a reference for future forays into 3D GI. This was the perfect opportunity to get a good base for it.I usually do these projects solo, and use my free time to make a project with a higher scope, but this time I met a very like-minded student in Jonathan Larsson. We decided to team up and not only go for the more difficult project, but also try to make it run at interactive framerate.
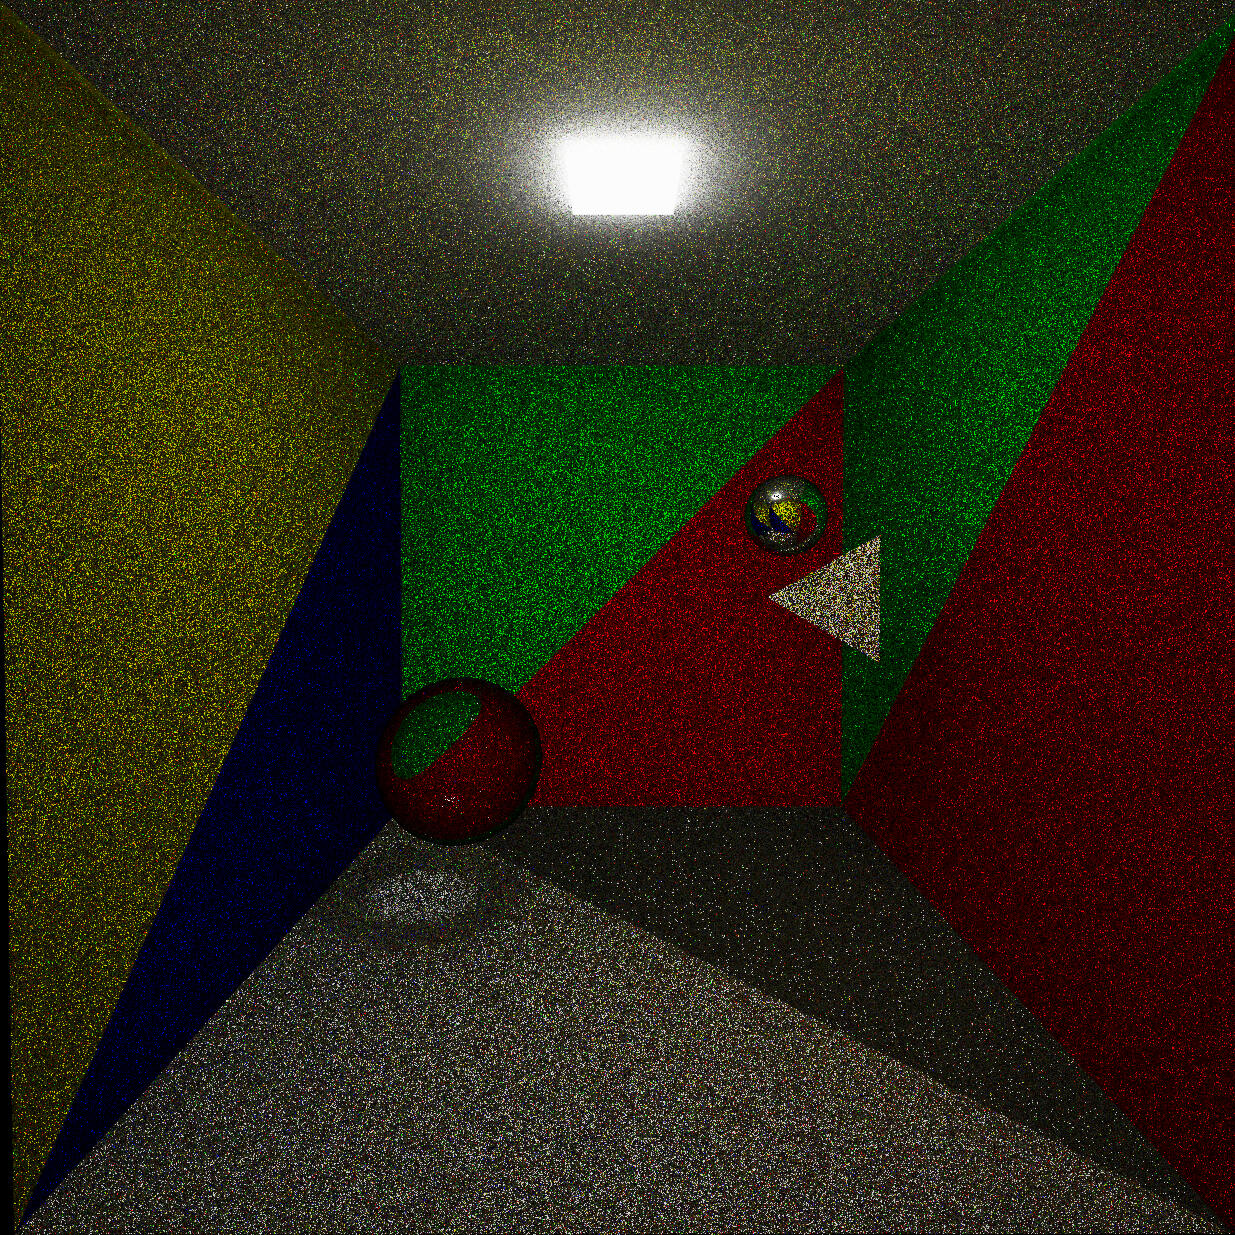
We finished the Monte-Carlo raytracer very early, and it looks pretty decent at a first glance.
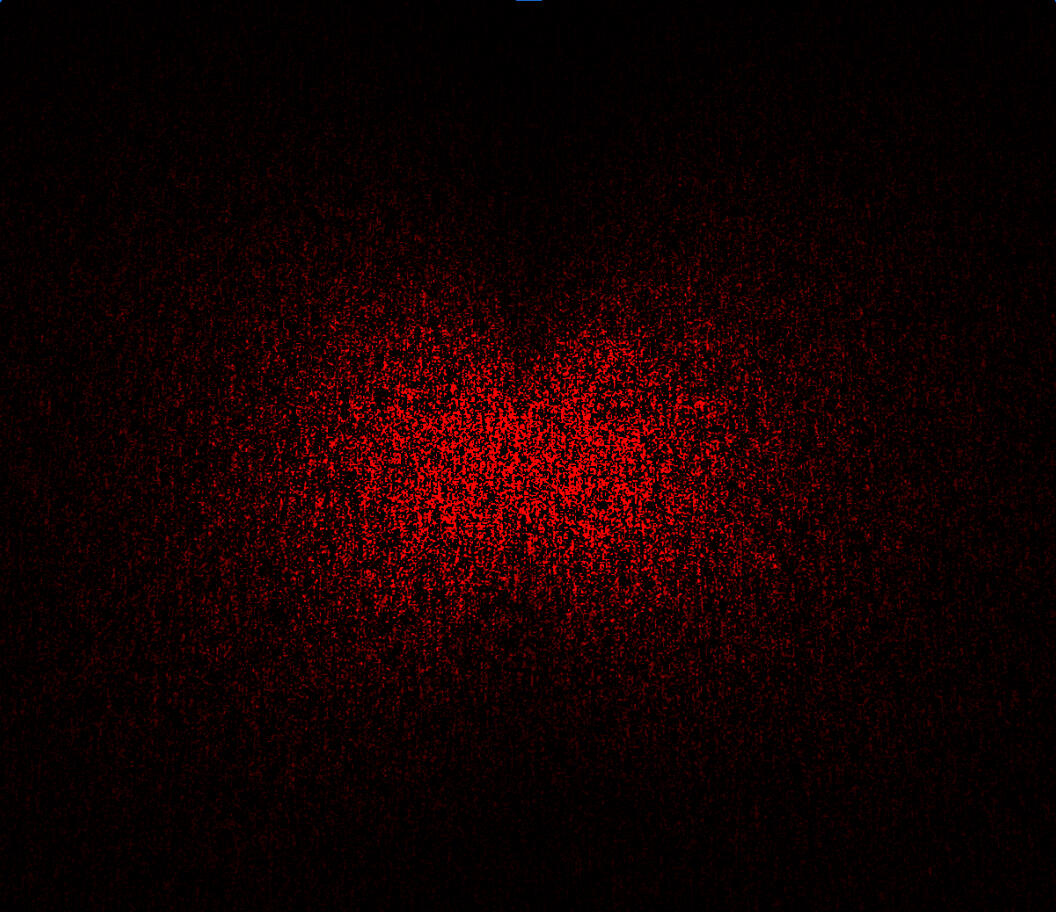
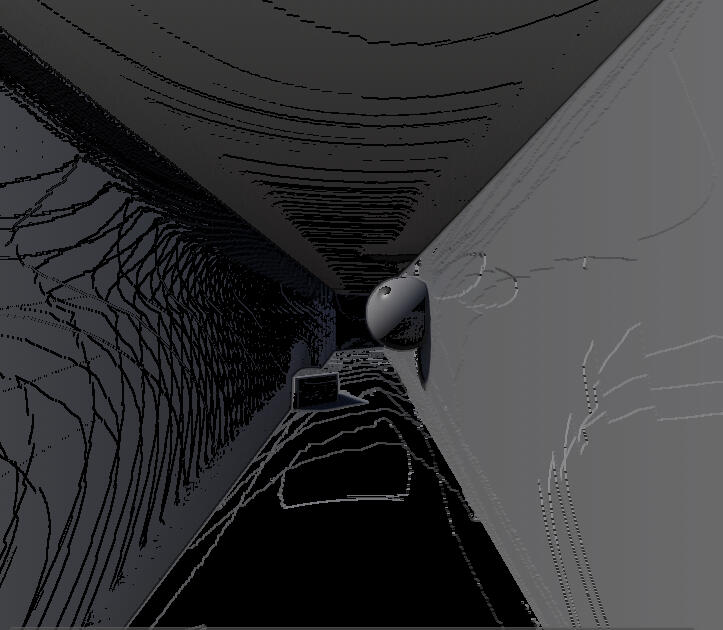
However, the easiest way to showcase its flaws is with caustics:
...or rather the lack of them.The reality is that only shooting rays from the camera and hoping they travel the extremely rare paths required for caustics to appear won't work.
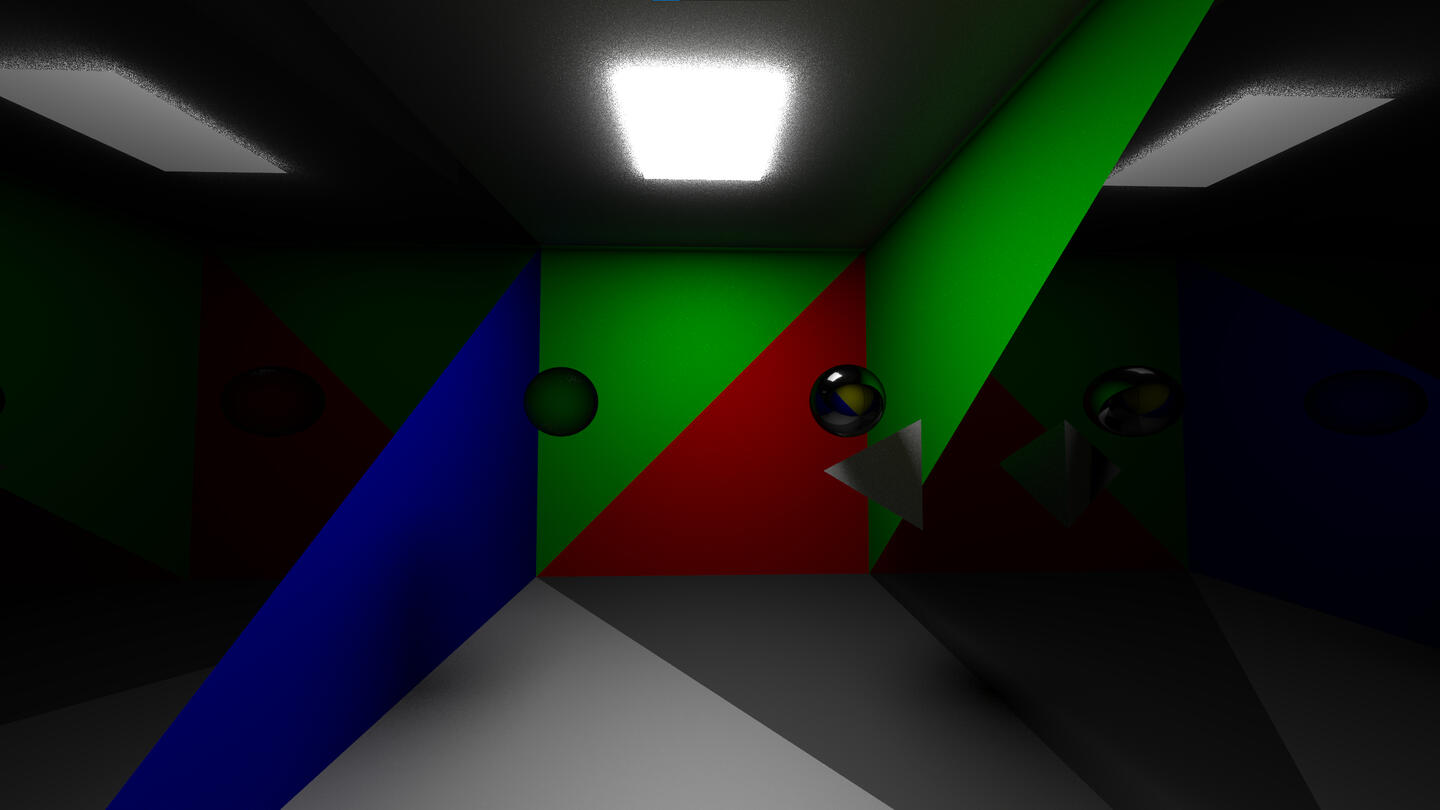
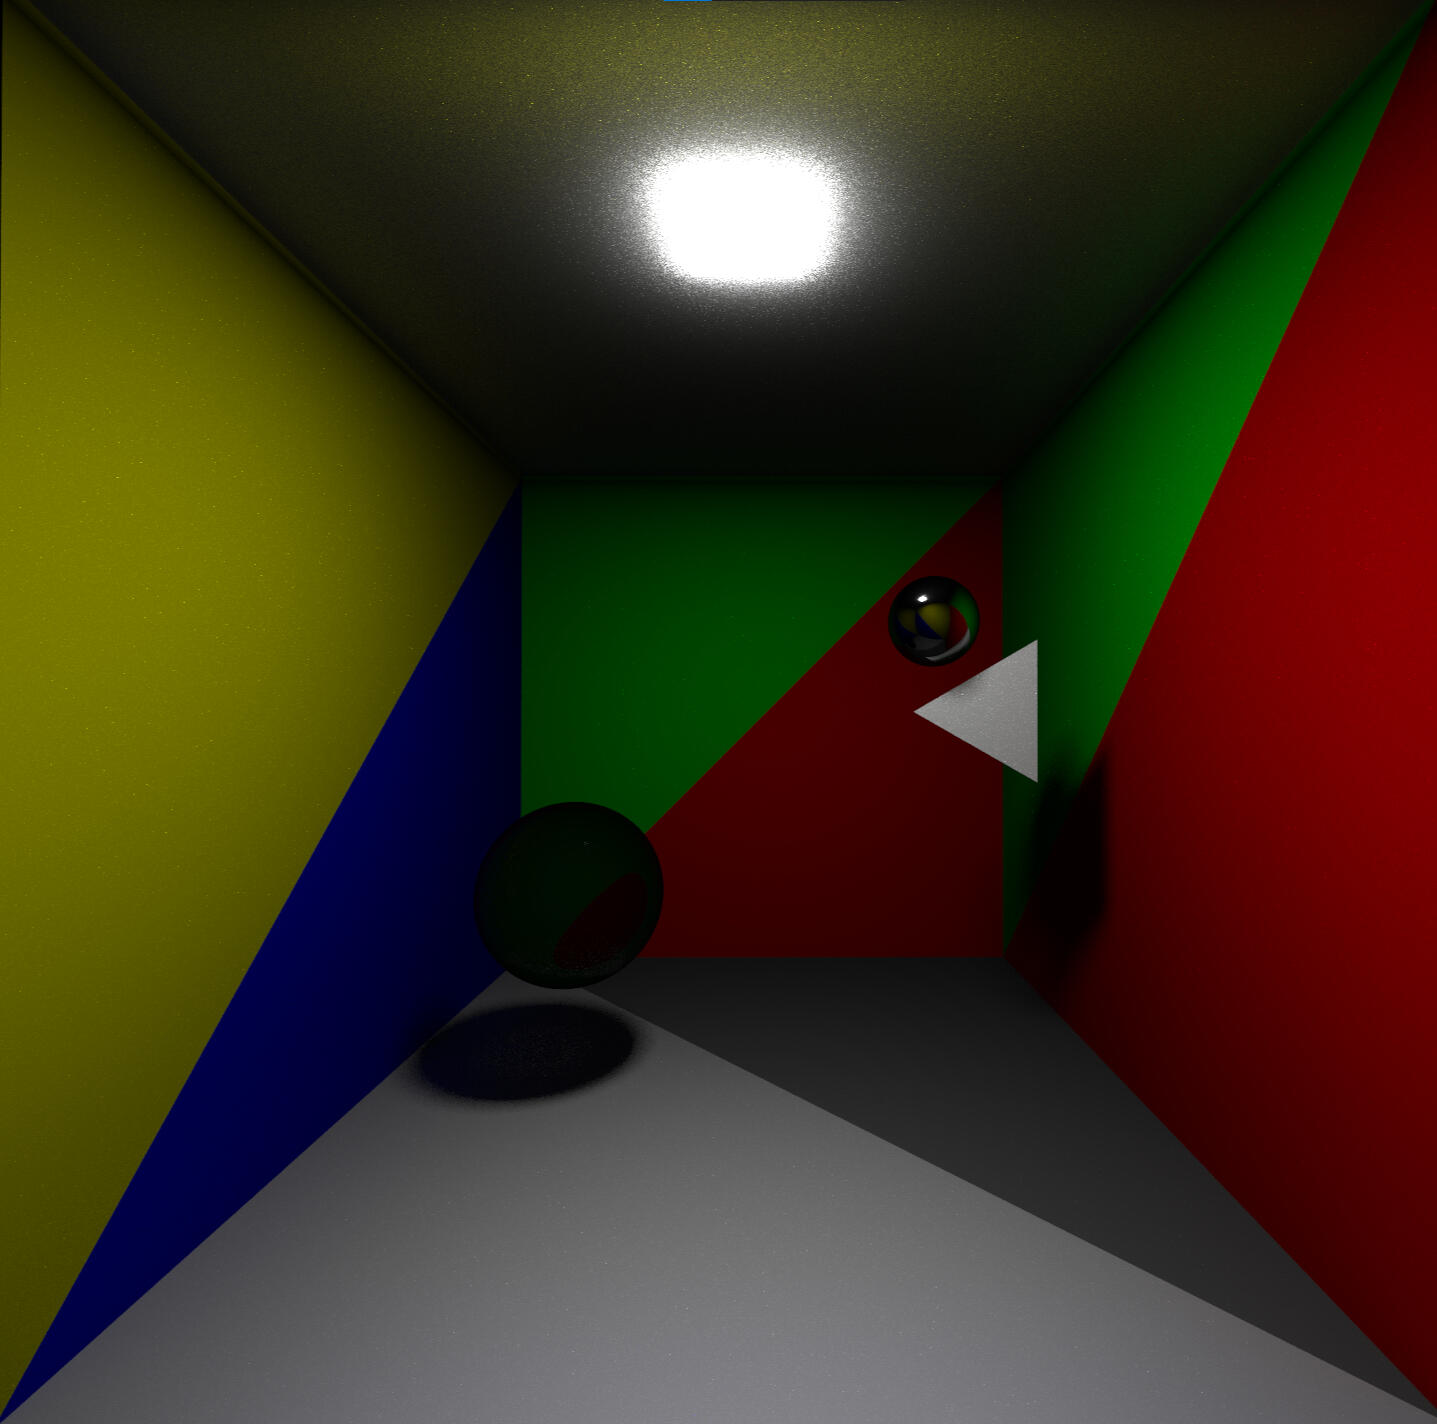
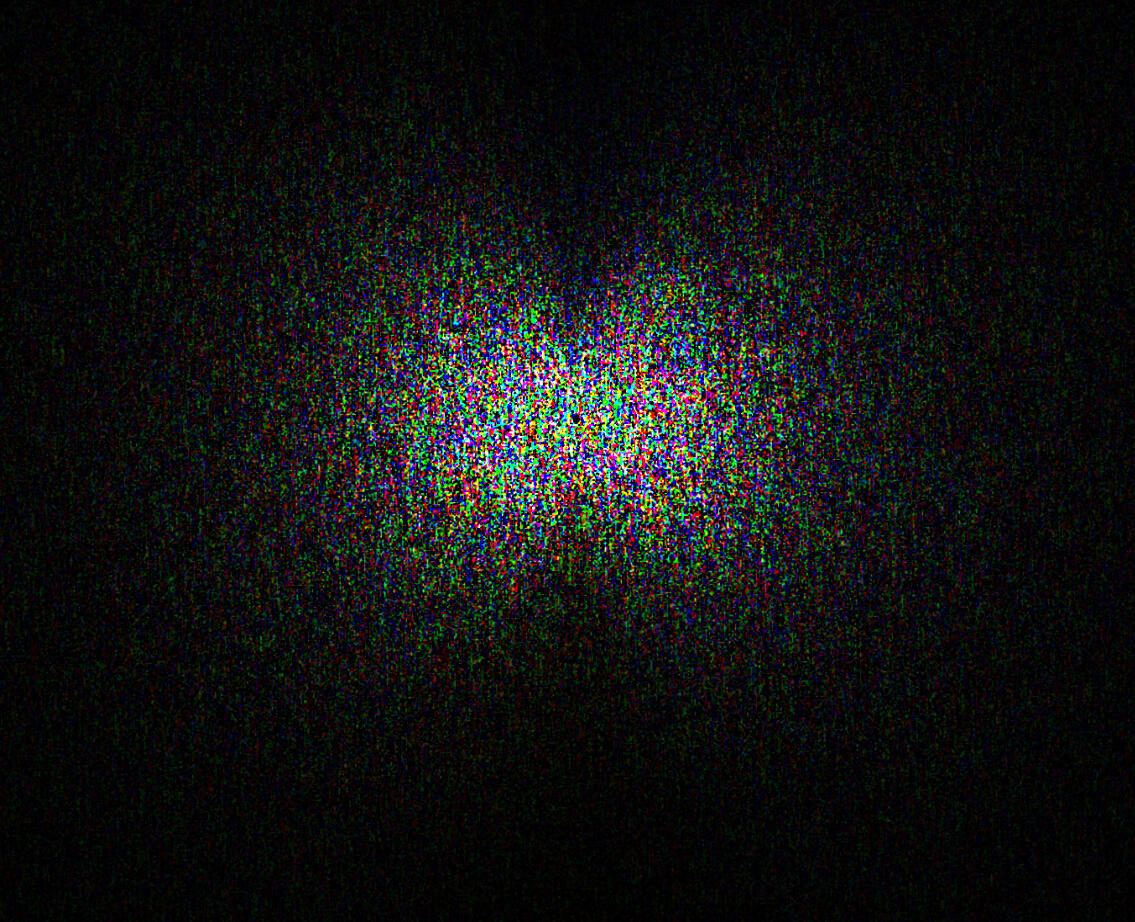
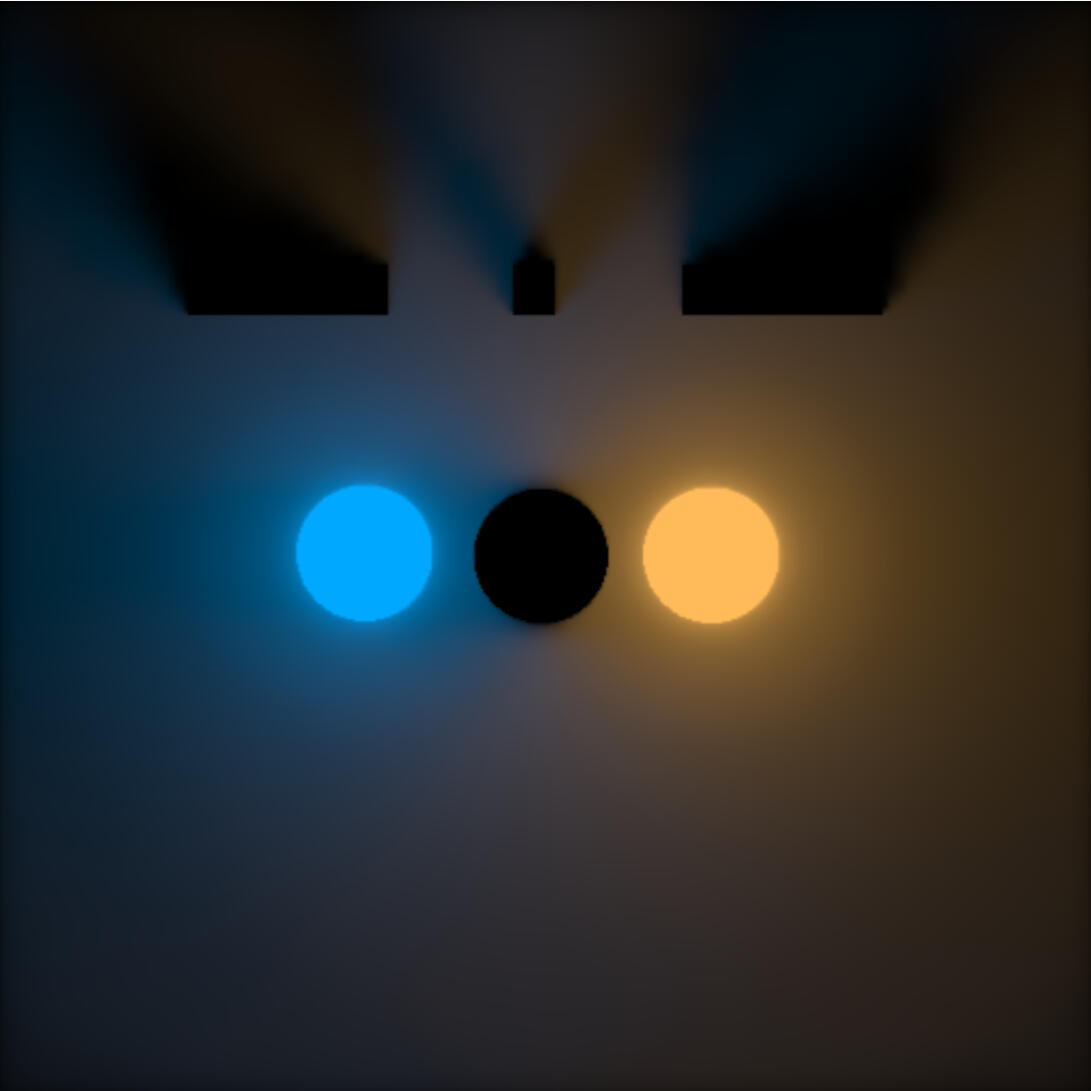
Instead, we used the Bidirectional part of the BRDF function: the energy transmitted is the same no matter the direction. In BDPT, you fire rays from both the camera and the light, then combine the radiance throughput via the two subpaths. The result is that ray paths that travel from the light through the glass sphere onto the floor become correctly represented, leading to accurate caustics:

Dieckmann's courses always place a strong emphasis on the underlying mathematics, which aligned perfectly with my learning intentions for the course. I understood roughly how the techniques worked beforehand, but had very little knowledge of the mathematics. The course requires implementing the technique based on the original 1993 paper and mathematical derivations of the rendering equation via Monte-Carlo Integration. It goes into detail on selecting optimized PDFs that reduce variance, cosine-weighted hemisphere sampling, solid angle to area measure conversions, the geometric term, etc. We used the Lambertian BRDF, which simplifies the BRDF-PDF relationship down to the albedo of the surface on a diffuse bounce.While the paper connected all hit points of the light path and the view path to reduce variance, the required BDPT implementation included only calculating the flux between the last two points of the radiance and importance path. This is the most common approach, as connecting each point along the path is more computationally expensive than simply firing more rays. To try to mitigate the increase in variance, I moved to Multi-Importance Sampling based on a 1995 SIGGRAPH paper by Eric Veach, but we still run into noise even with quite high ray counts.As a conclusion, I think I made good headway towards a reference model. I need to add temporal accumulation and start using my light paths more effectively, reducing variance. Trying to understand ReSTIR looks like an exciting next step for this.
Also, now that I can render some basic surfaces, I truly can't wait to try out implementing more advanced BRDFs and materials.
FFT Ocean simulation
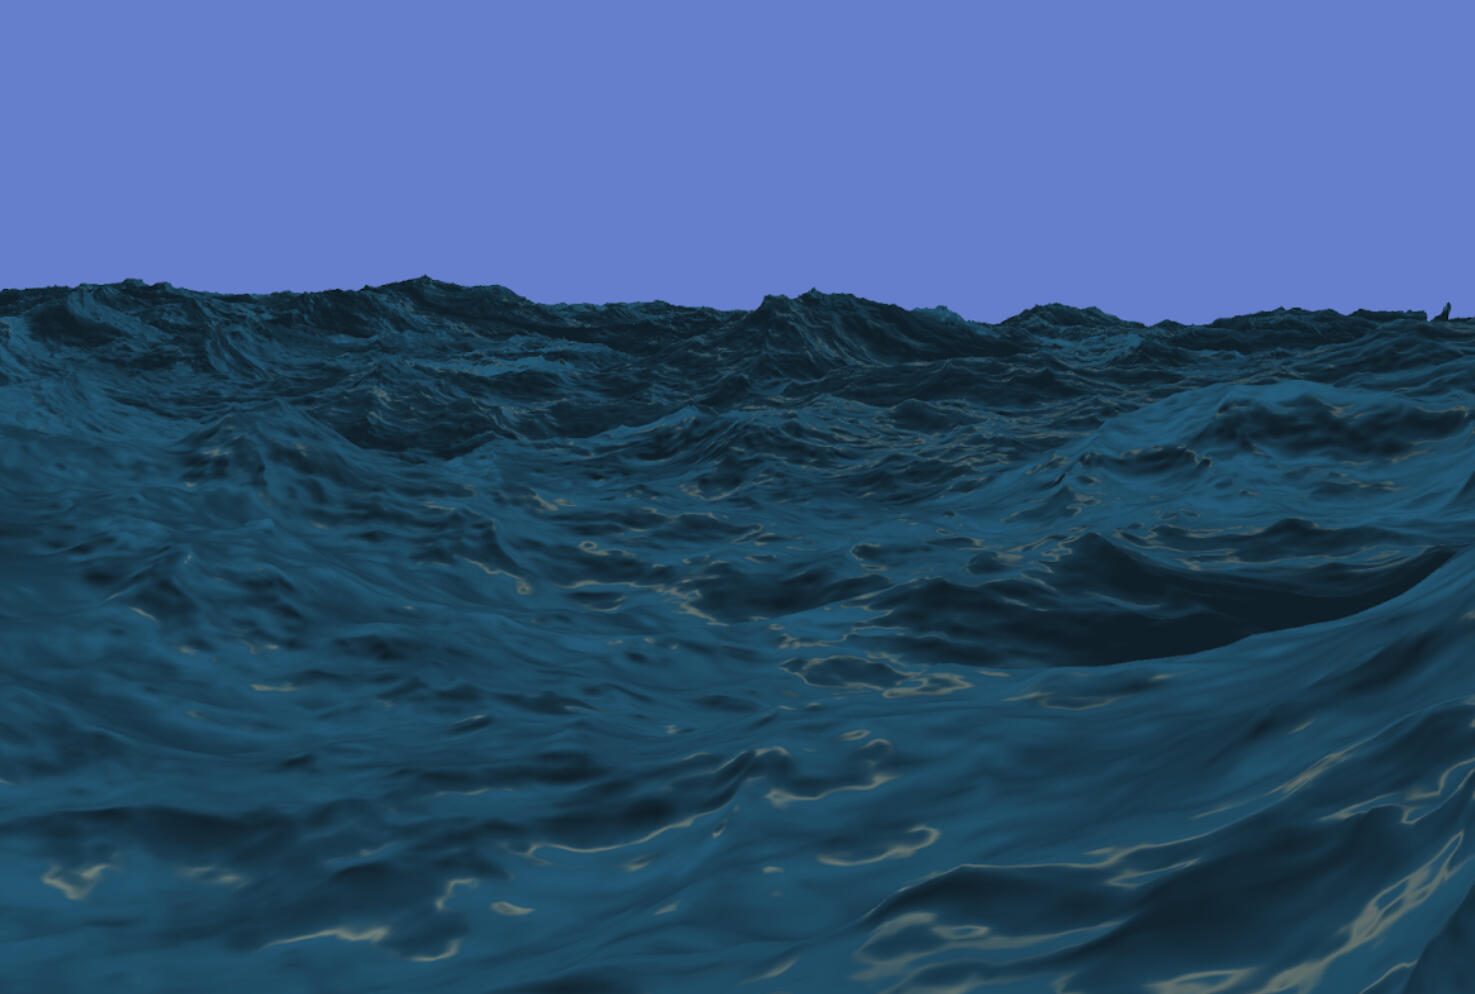
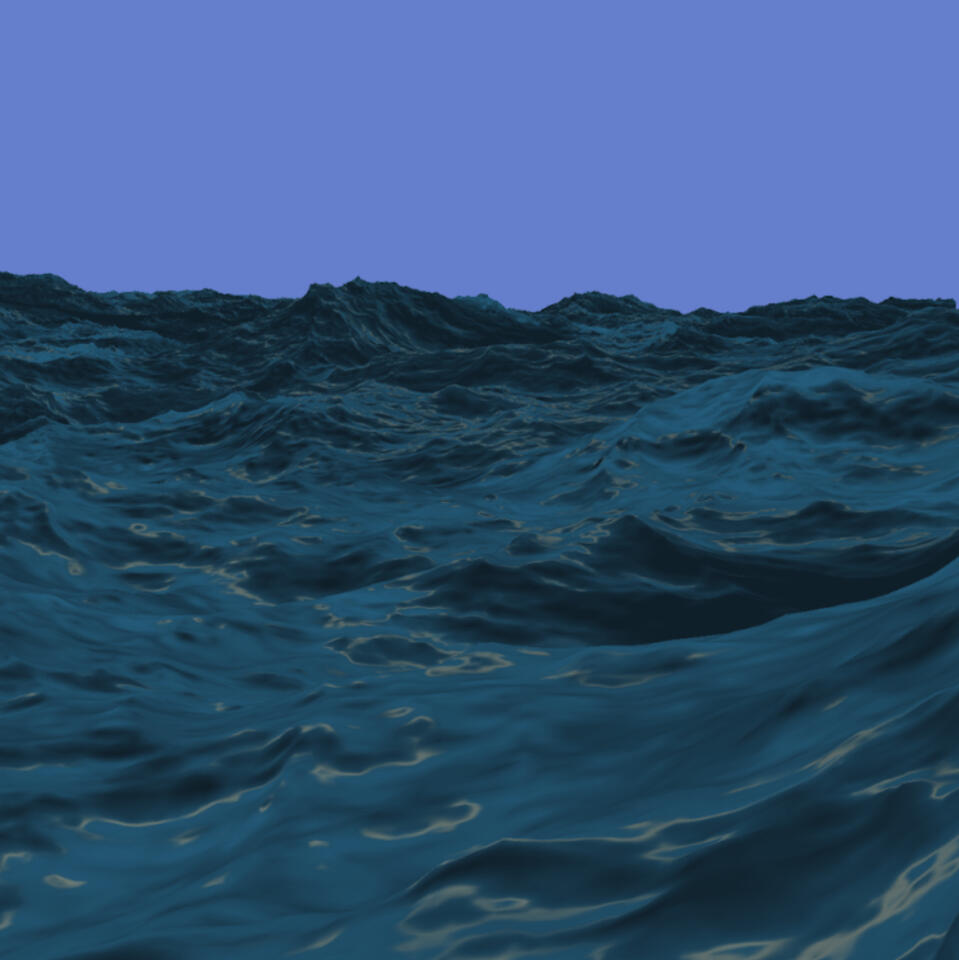
After getting comfortable with compute shaders and multi-stage GPU pipelines, I decided to take on a more advanced project. I implemented a 4-layer JONSWAP ocean simulation, generating displacement maps similar to the ones in Atlas or Sea of Thieves.
The core idea is to generate JONSWAP spectra containing millions of waves in the frequency domain on startup. Then, during runtime, propagate them over time, and run a parallel IFFT on the spectra, combining the waves to create height maps that the vertex shader can then use.What makes this technique especially useful for games companies is that it is deterministic: Synchronization across network clients only requires sharing initial seed values and a time offset, making it very practical for online multiplayer scenarios.
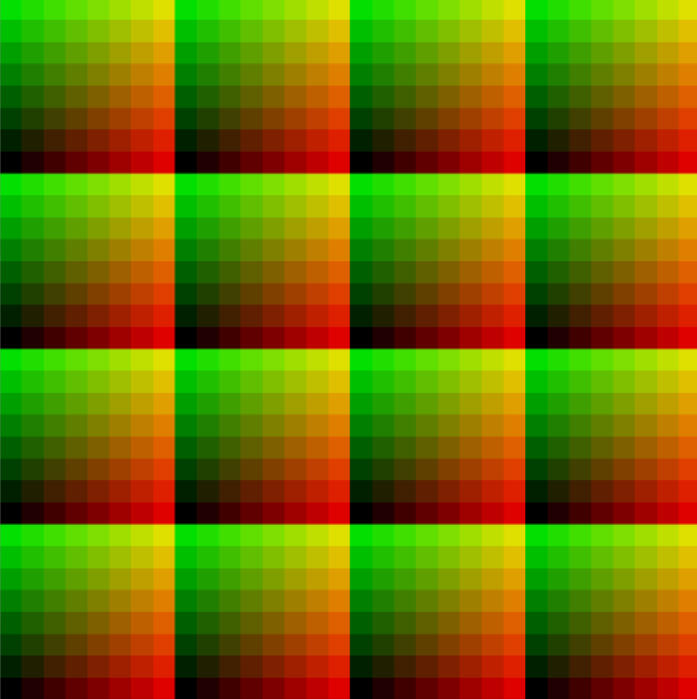
I produce the JONSWAP spectra stochastically with Gaussian noise using Box-Muller and a PCG Hash function. I pack the conjugates of each wave into the texture to guarantee the IFFT has a real result:
This is then progressed through time using Euler's formula and passed through an IFFT shader split into horizontal and vertical passes. Splitting kernels like this saves tons of compute time and can be applied in a multitude of situations. I first encountered it when writing the Gaussian blurs for my Oscilloscope renderer.After the IFFT passes, I assemble the height maps. The surface gradient is not approximated. Instead, I calculate the wave derivatives in the frequency domain, then apply a second IFFT separately to generate slope maps containing perfect gradients for the displacement map.
To avoid surface repetition, I sum 4 layers of displacement maps at different scales and tile sizes. The result is a large surface with both large rolling waves and high-frequency detail that doesn't repeat:
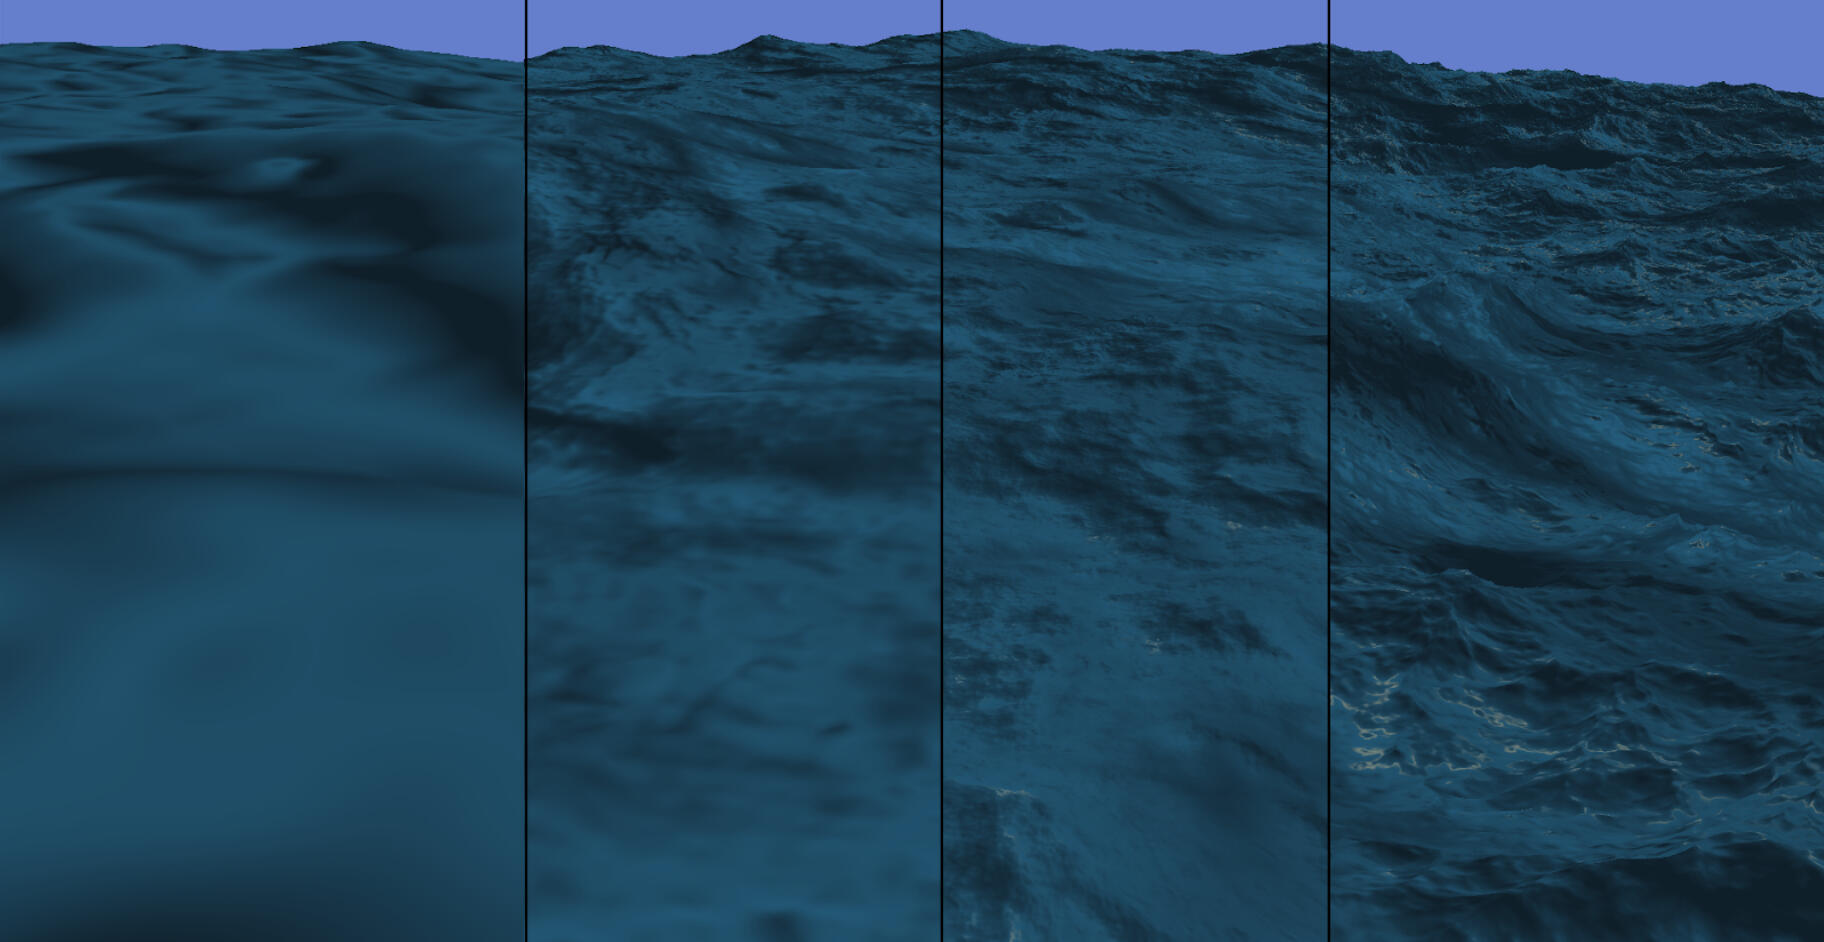
This simulation uses roughly 4 million waves, executing the stack over 1024x1024 resolution textures. For reference, Sea of Thieves uses 256x256 resolution textures.
I encountered a few issues during development, the biggest was an incorrect operator I had mistyped in my butterfly-value calculation in the IFFT pass. The difficulty in debugging the issue was that the surface would appear slightly incorrect for most values:
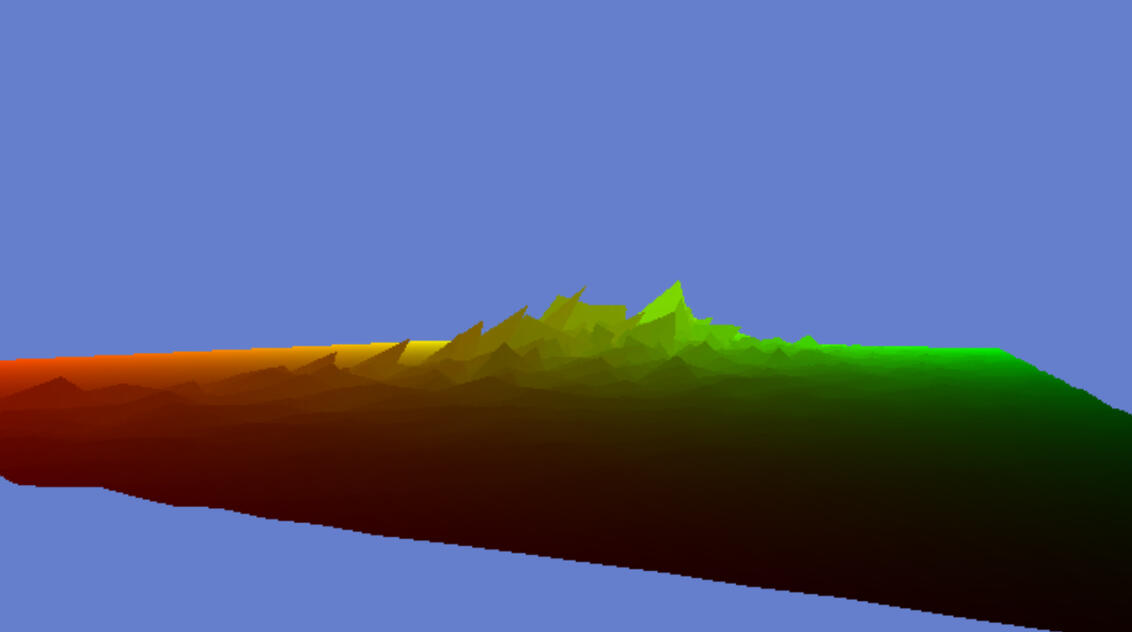
And then suddenly explode after a setting was tweaked.
Tracking the issue down required isolating each pass and verifying variable ranges step by step to find where exactly the values exploded.In conclusion, this project made me confident in working with spectral inputs and displacement maps. I improved my debugging techniques, and I gained an efficient, great-looking simulation to use for later projects. The next steps are adding Jacobian-based foam, a dynamic LOD system, and surface interactivity. Additionally, I want to explore other spectra, as a lot of time is spent tweaking minute settings to get the simulation you want.
I later also ported a stylized version of the simulation into Unity 6, using a quantized version of the xDoG filter I learned about during my oscilloscope project.
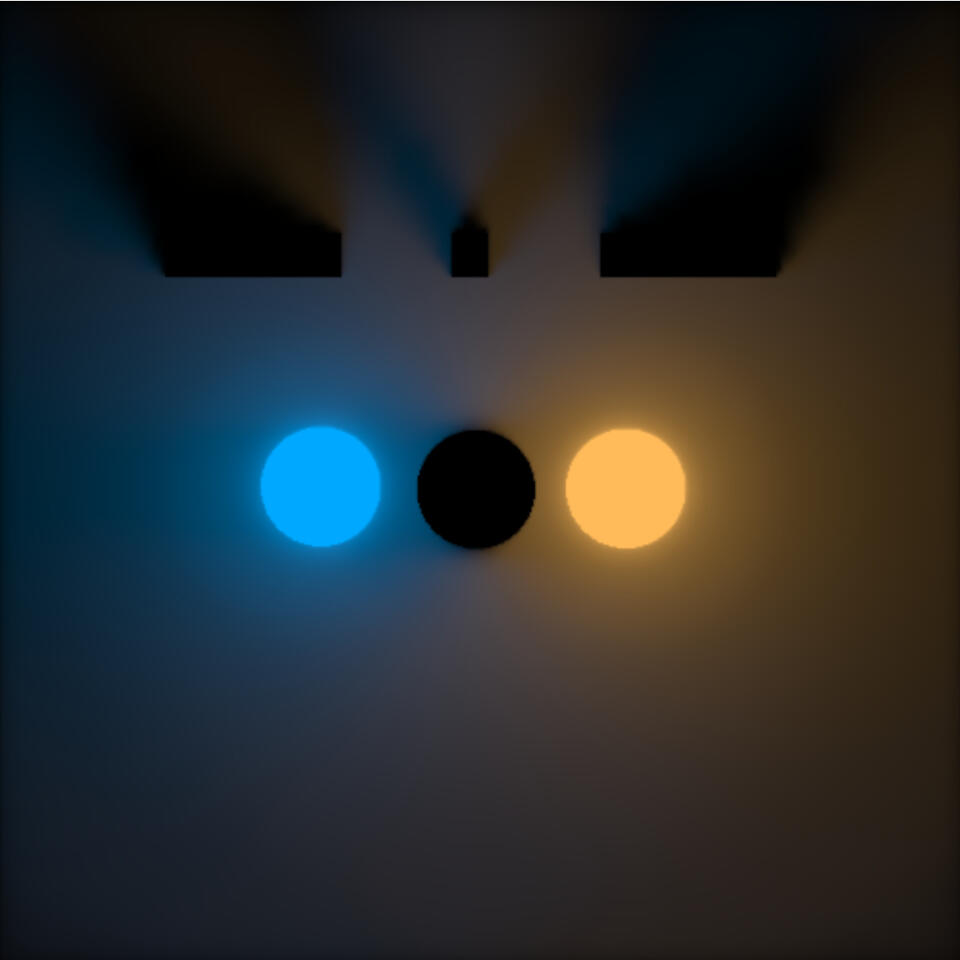
Hearing about a technique promising deterministic, constant-time, scene-independent GI was intriguing to say the least. I decided to implement something as close to "default" as possible. RC is a rapidly advancing field, and new fixes and techniques are frequently found. I wanted to understand the fundamentals properly, so I can more easily do fixes, acceleration structures, and eventually a screenspace implementation as future side projects.RC is quite different from typical GI solutions. The best way I could describe it is as an optimized storage solution for radiance gathered by light probes. It works based on varying the accuracy of stored data according to the "penumbra condition":

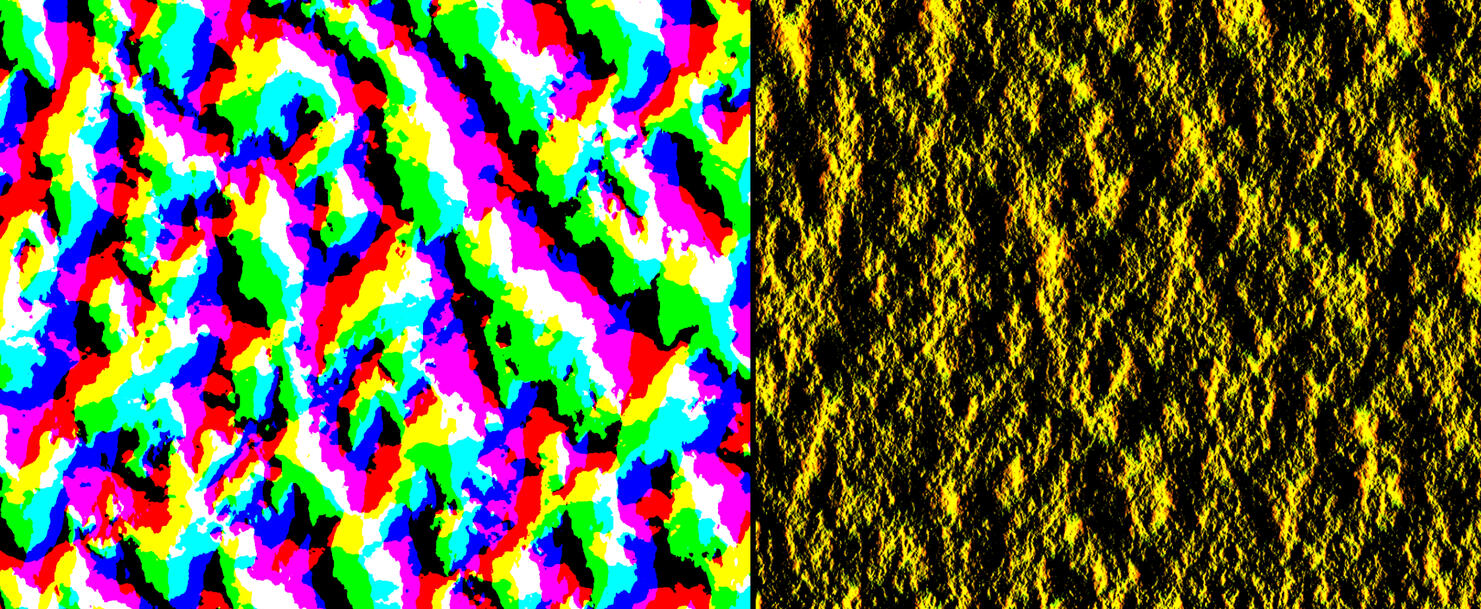
The penumbra condition states that to resolve a penumbra accurately, we need higher spatial resolution near the blocking wall and higher angular resolution farther away.In layman's terms, imagine light probes at the ends of each line: When close to the wall, we need to use short spacing between probes to interpolate between them, but determining whether a probe is lit can be trivially resolved by casting rays in the cardinal directions. While further away, this reverses. We can use more sparsely placed probes, but those probes need to cast rays in many more angles to determine if they are inside or outside the lit area.RC uses this by storing data in layers. Lower cascades have short probe spacing but cast only a few short rays. Meanwhile, higher cascade probes are placed sparsely, but cast more rays that travel further.Theoretically, the scaling between cascades should be able to follow a 2x increase in spacing and a 2x increase in angular resolution. In reality, however, this often leads to tons of artifacting unless a high number of cascade 0 rays are used. Instead, I implemented a 4x increase in angular resolution, as it conveniently means that each cascade can be stored in a texture of equal size:
Here, each UV square is a probe, where each texel contains light data from a ray. This is cascade 2, so we have 16 probes with 64 rays each. Cascade 0 would have 256 probes, each with 4 rays. This storage solution is not optimal, as a 3x scaling has almost no loss in quality, but I wanted to keep my first implementation as simple as possible.For the actual rays, I implemented DDA raymarching by following a fantastic blog by a user named aaaashley. It can be found here:
After raycasting and storing the data in each cascade texture, I merge the cascades probe-wise from top to bottom using bilinear interpolation. This can be done efficiently by just setting OpenGL's texture sampling to bilinear, but I've never done proper interpolation before, so I decided to handroll my own. This results in a slower program, but the point with these projects is to teach myself graphics programming, and I've been intrigued by a bicubic interpolation method from GPU Gems 2 that uses only 4 texel reads for ages. As I see it, I'm just preparing for the opportunity to implement that one.To put all of this together: After some testing, I found that placing C0 probes every 2 pixels, each marching 4 rays over a 4-unit distance, worked well. In total, I used 6 cascades with the 2x/4x scaling mentioned above, resulting in this:
As can be expected, this has all the hallmarks of a vanilla RC implementation. It has clear resolution issues along penumbra edges, and the bottom right shows light bleeding. It also suffers from ringing due to the bilinear interpolation. However, it is my first GI implementation, and in my opinion, it looks pretty neat!Now for the bugs: Determining whether a GI solution has bugs or not is difficult. Even more so when implementing a technique that isn't intended to resolve perfectly.
Left images contain bugs, the right ones are after a fix:


Knowing if issues were my fault or inherent to vanilla RC was tough. I used plenty of test scenes, such as walls of increasing distances and penumbras like the ones above. I also implemented some interactive tests, including viewing specific cascades or manually increasing or decreasing ray distances to visualize ray directions. Some of these debug views can be found below:


After I had a working implementation, I really wanted to try to profile it. I chose NVIDIA Nsight for this, as its frame capture at least lets me view graphs and specific pass metrics. I tried following an NVIDIA tutorial of the P3 method, and determined that my raymarcher was suffering from excessive loop branching. I solved this by adding a precompilation step to my shader files, which wrote my ray lengths as compile-time constants. This enabled loop unrolling while letting me avoid managing multiple near-identical shader files.All in all, this cut execution time by around 50%. The final frame time is ~3.9ms for a 1024x1024 image, running on an RTX 3080.In conclusion, this project included a ton of firsts for me. It was my first exploration of GI, and included my first raymarcher and interpolator. I also learned about the importance of test scenes, and even got to put my computer architecture knowledge to use while learning a bit of profiling!All in all, this was a super fun project, and I can't wait to explore RC further, either by moving to screenspace or trying out holographic radiance cascades.
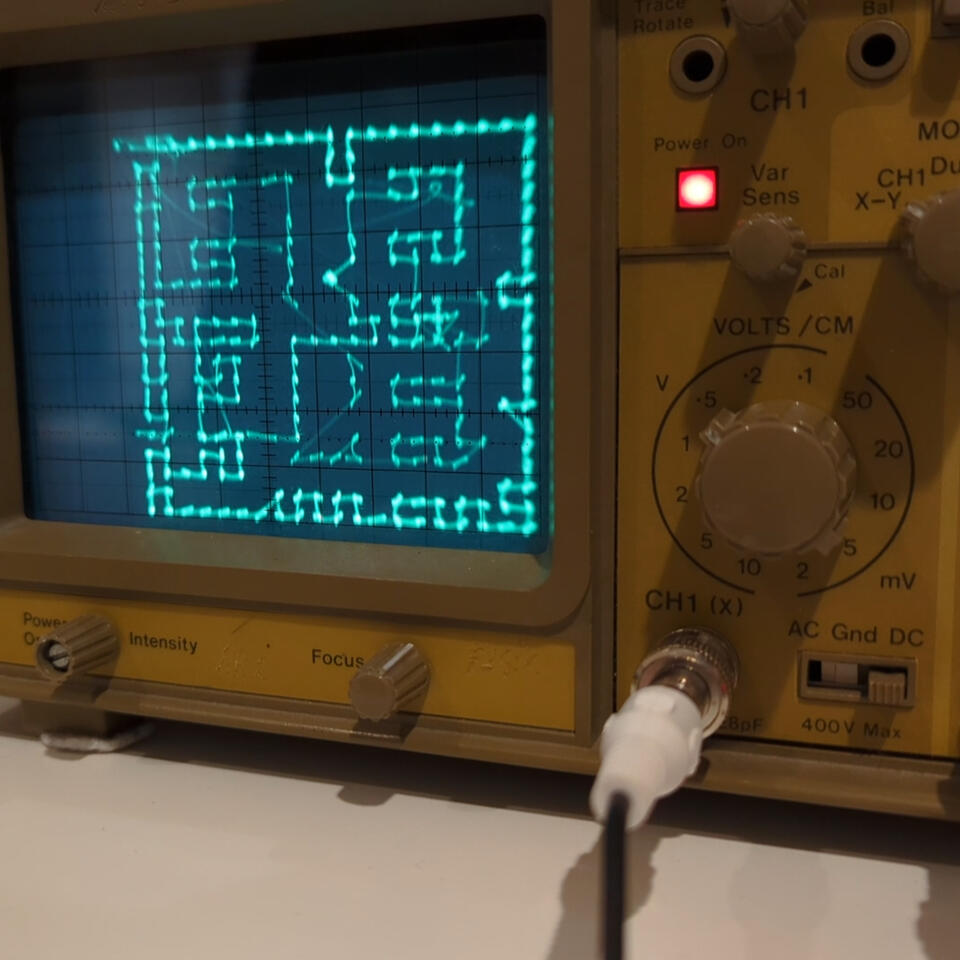
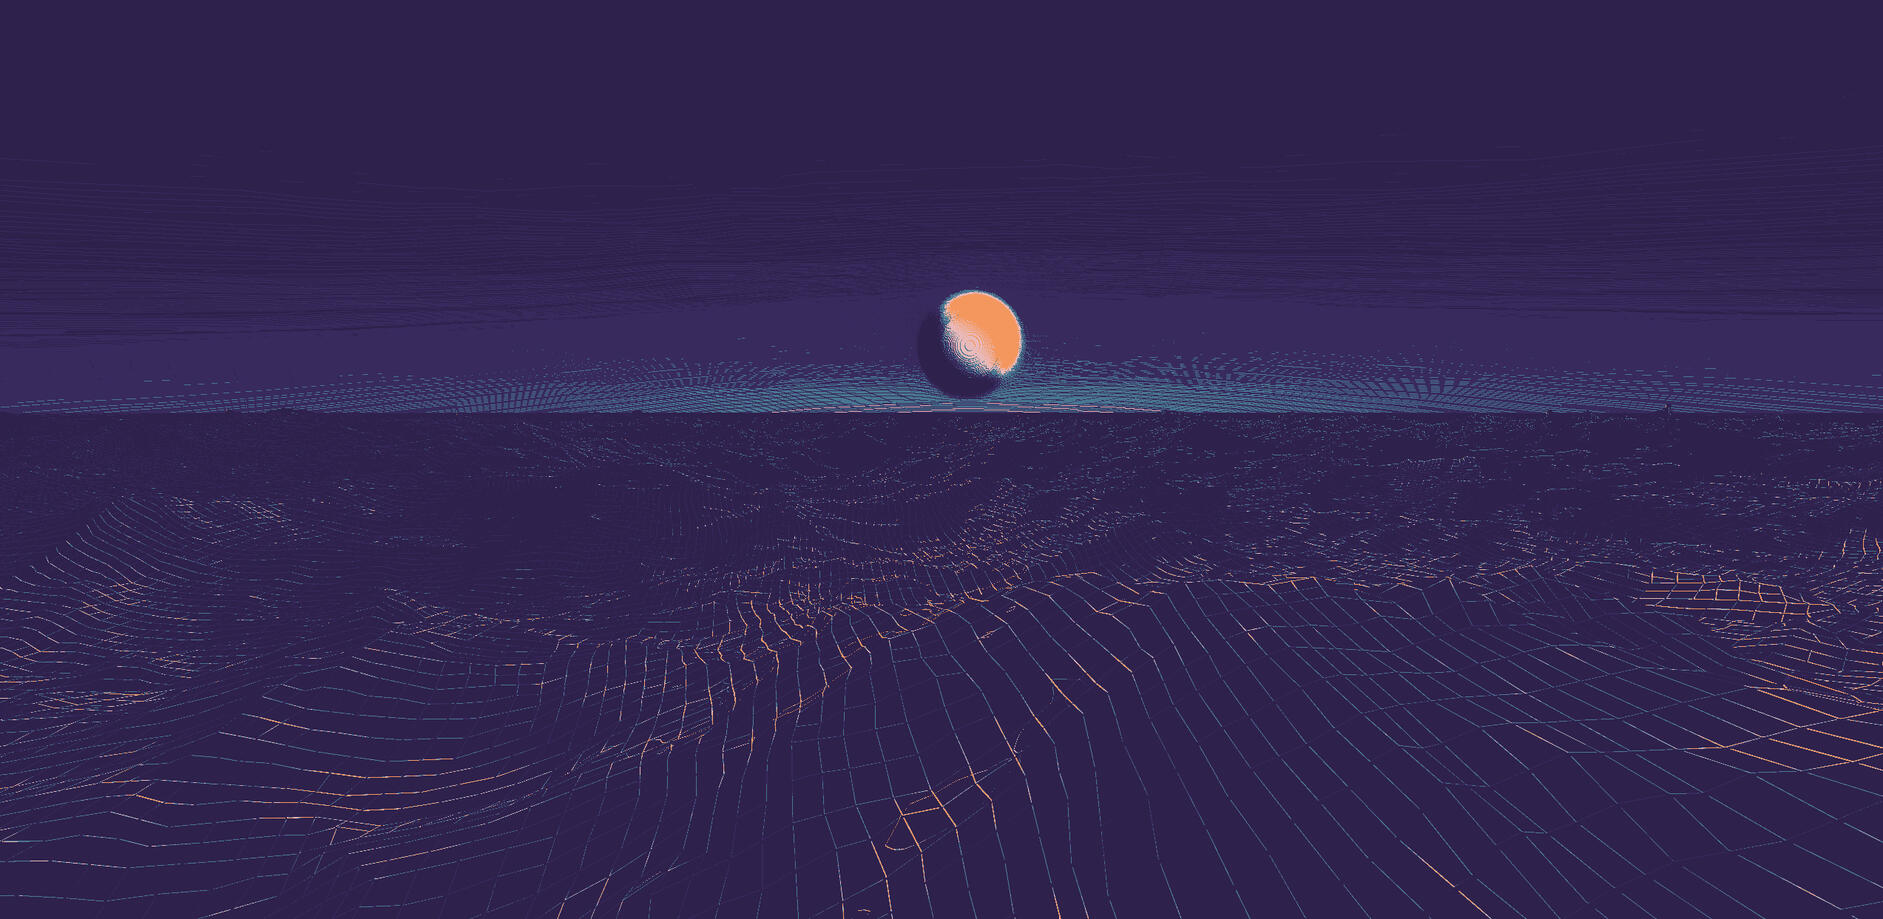
Rendering Unity on an oscilloscope
After exploring Unity shaders with Catlikecoding's shader tutorials, I wanted a project where I couldn't just copy someone else. Diving into compute shaders, image processing, and edge detection, I decided to render Unity onto an oscilloscope by sending video signal through the audio jack.I'd experimented with procedural unity audio earlier, and during it I'd discovered oscilloscope music. When the music signal is input into an X/Y oscilloscope, the left and right channels create vector graphics!
BUS ERROR Collective's "Primer" track
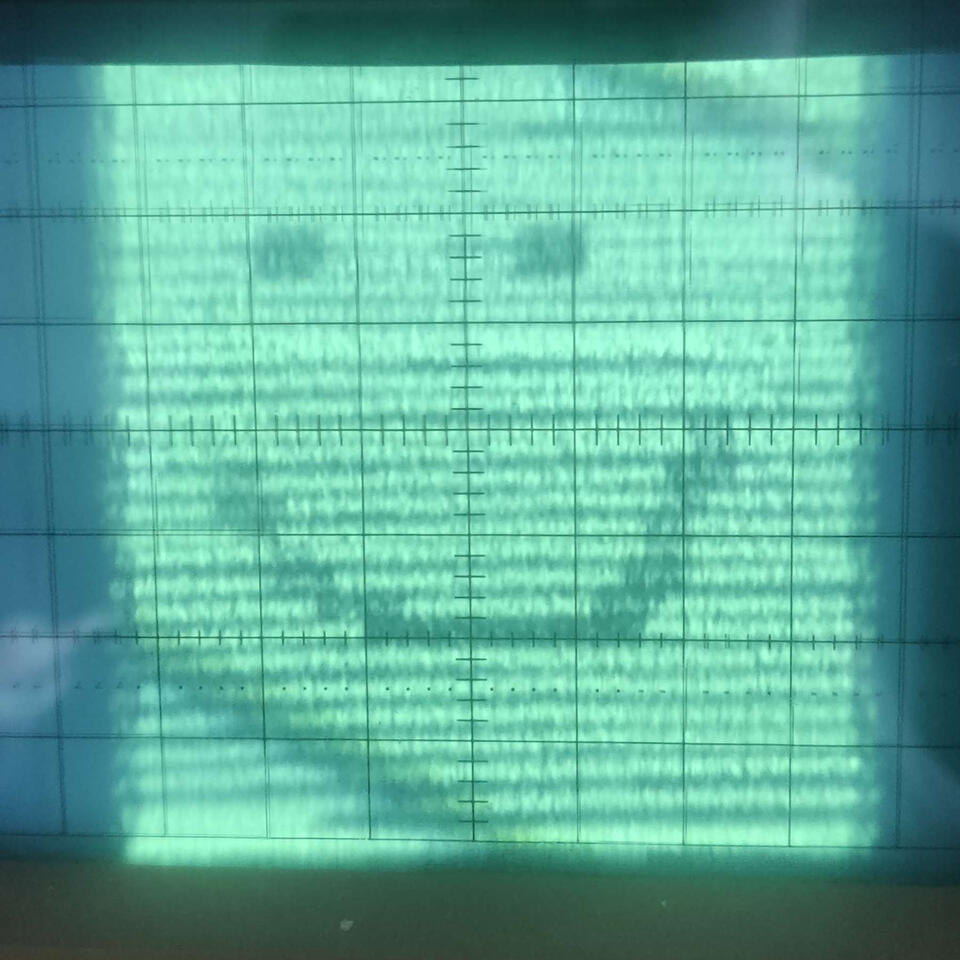
Putting two and two together, I thought, what if I rendered games on it?
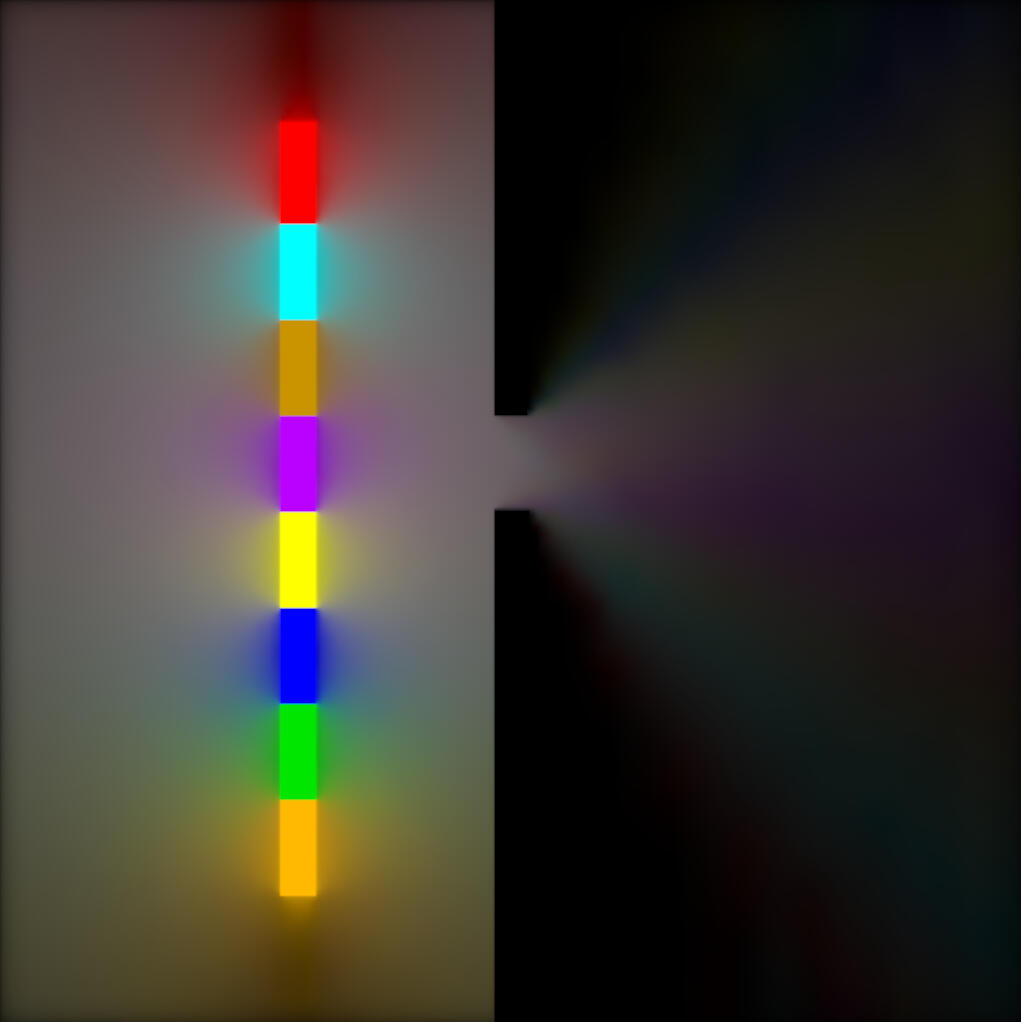
Now, this is not a new concept of course. The first ever games were rendered via vector graphics, and there are plenty of videos of DOOM running on one. However, pretty much all projects involve cutting up a video cable. I wanted to output my video signal through the audio jack, just like how oscilloscope music works.Turns out, no existing solution actually exists for this! The closest project I've found is BUS ERROR Collective's Hilligoss, which converts video to audio that can be rendered on an oscilloscope, but it is entirely offline.This hobby project turned into a great adventure in image processing. Unity by default uses 48KHz, which means it represents its audio with a stereo array of 2048 floats that get renewed every ~20ms. Pairing these up into left/right channels, they can be used as a series of coordinates for which to move the oscilloscope laser along. This also represents the hard data limit: if we're using traditional pixel rendering, only 1024 pixels can be rendered every 20ms - that's a 32x32pixel image!
So the challenge becomes to cram the entire image down into 1024 points while maintaining legibility. And we have a frame budget of 20ms to dispatch the signal before the next audio bus arrives.Here's what I came up with:
Typically edge detection can be done via a Sobel filter, but it runs into issues when working with detailed images. I could use the g-buffer as a base, but then I lose lighting data. Additionally, I'd like to have depth-based edges as well.
As can be seen, I needed to simplify the image first.This is where the lesser-known Extended Difference of Gaussians (xDoG) filter comes in. You run two slightly different Gaussian blurs on the image and subtract one from the other. The result is a black-and-white image containing higher values where differences occur.
Quantizing this down results in the following:

Now we have a simplified image we can run the Sobel filter on.
This is quite a lot of processing, but splitting execution kernels into horizontal and vertical passes significantly reduces computation time. Doing the same thing based on the g-buffer retains some details that were lost in the previous xDoG pass, showing that the best of both worlds would be to use all three buffers.

We've reduced the image down to just a few edgelines, but it still needs to be compressed further. Using the FAST corner detection algorithm, we can further reduce the number of points and finally output the image through the audio channel to the oscilloscope. However, a new challenge appears:
The vector graphics data is completely unsorted, leading to random connections between the edges. The project that keeps on giving has become a graph traversal problem!At the time, I wanted to try my hand at solving this myself. I wrote a compute shader with my own algorithm that generated a greedy nearest-neighbor graph. It finds the best local candidate from a given point and connects to it using non-atomic operations. It then handles the race conditions iteratively, giving an approximate result after a few passes.
This is where the project is currently. My hand-rolled algorithm works, but causes jitter due to race conditions in the initial pass. I believe my next step will be to move away from the FAST algorithm and focus on cleaner single-pixel lines. Then either move the data to the CPU and perform the graph traversal there, or run a marching squares algorithm to find contours, and then link those.Whichever way I go, I think I'm making pretty good headway towards the world's first real-time screen-to-oscilloscope renderer!In conclusion, this project has been incredibly rewarding and productive for learning graphics programming. It's taught me how to work with post-processing, asynchronous GPU readback delays, compute shaders, frame budgets, and data limits. It's made me research topics I'd never cover otherwise, and highlighted that there are areas where SIMD isn't king. On top of this, it's shown the luxury of having a side project: Whenever I get stuck, I can work on other projects with this in the back of my mind, and return with more experience.

I'm Björn, a graphics programmer from the middle of Sweden. I am currently finishing up my Master's in Computer Science at Linköpings Universitet.I have coding experience in C++ and C#, and I've mainly used Unity and OpenGL for projects.I've also worked as an IT support technician at GDM throughout my studies, supporting small to large-scale companies, hotels, and streaming services.Outside of work, I'm a massive fan of freeride/powder skiing, skateboarding, games & TTRPG.